
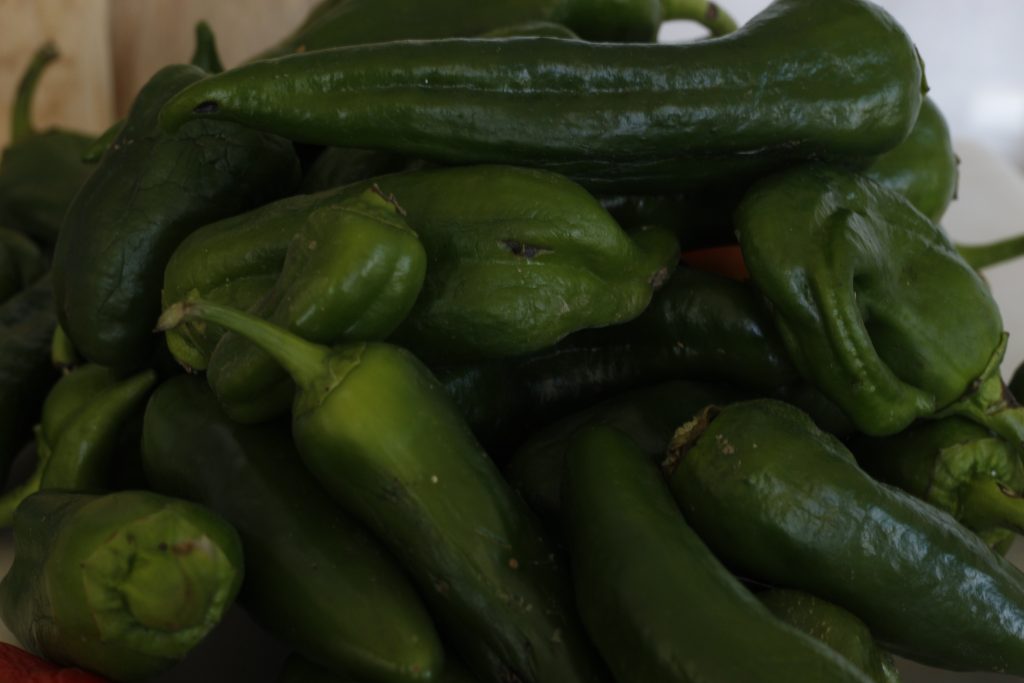
Peppers must be picked green, when an early frost strikes! We ended up with several large paper bags full. Between fermenting, roasting, and freezing, we are making the most of our harvest. Lacto-Fermented Peppers That Are Savory And Simple To Make help to use up the harvest, and benefit your gut with good bacteria. Give them a try!

We had, growing in our garden this summer, several different pepper varieties. They were varying sizes and colors when they ripened. One had a touch of heat, even though it was a sweet variety. So, I am using all the types of pepper. Regardless of size differences, they are all going in together.
A Health Boost
Of course, peppers are healthy for us to eat. They have a lot of vitamin C, which we need to consume daily, because it is a water soluble vitamin. Our bodies will not store it. Our immune systems need Vitamin C to function optimally. Vitamin C helps our bodies to produce collagen, which helps our bodies to retain youthfulness. Collagen, a protein, helps our joints to stay strong, and helps our skin to retain elasticity. Peppers are also a good source of B vitamins and Vitamin A.
So, these are all reasons to eat more raw peppers.
But lacto-fermented peppers have increased benefits that go far beyond raw!
What Is Lacto-Fermentation?
Lactobacillus is a bacteria on the surface of all raw vegetables and fruits. It is there by design. It keeps the plants healthy and allows the soil to decompose vegetable matter into more soil.
When we lacto-ferment a vegetable or fruit, we submerge it in a salt brine which inhibits bad bacteria from developing and growing. The lactobacillus flourishes and grows in the salt environment. Unwanted bacteria is kept from growing.
Then the lactobacillus can consume natural sugars in the vegetable or fruit, and turn it into lactic acid.
Lactic acid gives a ferment the flavor we expect it to have, a tangy tart kind of flavor.
Lacto-Fermented Peppers Safety
Lacto-fermenting foods is completely safe, and previous generations relied on fermentation to survive. It dates back to the beginning, so there is no reason we cannot end up with a good result now.
It just requires us to pay attention to a few things, to prevent mold from growing.
- Clean your jar or crock with hot, soapy water and dry completely with a clean kitchen towel.
- The vegetables or fruit should be fresh, and rinsed of all dirt and debris.
- A proper amount of salt in a fermented recipe is extremely important, because it prevents mold growth as the good bacteria flourishes.
- Shake the jar several times a day. This keeps the vegetables covered in the salty brine. This method works best for short-term ferments of 2-3 days.
- Alternatively, weigh down the vegetables, and keep the level of the brine above the vegetable line.
What Makes Lacto-Fermented Food So Good For You?
According to the book, Nourishing Traditions by Sally Fallon and Mary G. Enig,
“The proliferation of lactobacilli in fermented vegetables enhances their digestibility and increased vitamin levels. These beneficial organisms produce numerous helpful enzymes as well as antibiotic and anticarcinogenic substances. Their main by-product, lactic acid, not only keeps vegetables and fruit in a state of perfect preservation but also promotes the growth of healthy flora throughout the intestine.”
The connection between the brain and the gut improves. This improvement can help increase serotonin release in the brain, and may help a lacto-fermented foods eater to think more clearly, and remember more.
Ingredients For Savory Lacto-Fermented Peppers
- Fresh peppers- any variety, cut into pieces that fit into your fermenting vessel
- Quality salt- like Redmond Real Salt
- Spices of choice- I used cumin powder
- One or two whole hot peppers per jar or fermenting vessel- This is the one we have grown.
- Room temperature filtered water
Equipment You Will Need
- Clean kitchen towels
- Measuring spoons
- Wide-mouth quart-sized jars or a fermenting crock
Steps To Make Lacto-Fermented Peppers
One: First, rinse the peppers very well to remove any dirt or debris that could be on them. Dry the peppers with a clean kitchen towel.
Two: Cut the tops off the peppers and remove the seeds and membranes from the insides. Slice your peppers into halves, if they are small. Cut them into quarters or eighths if they are large. Remove only the stem from the hot peppers, and keep them whole.

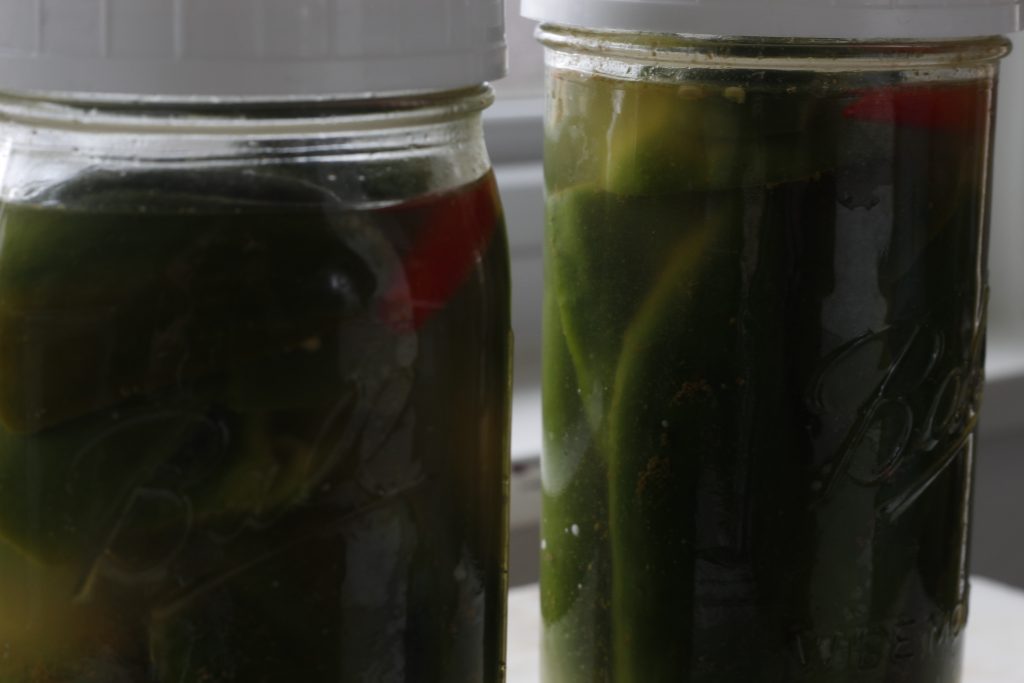
Three: Fill your jar half way with pepper pieces, placing them so that they fit tightly together.


Four: Next, sprinkle on one tablespoon salt and one tablespoon cumin.

Four: After that, continue to tightly place more peppers on top of these ingredients and peppers.
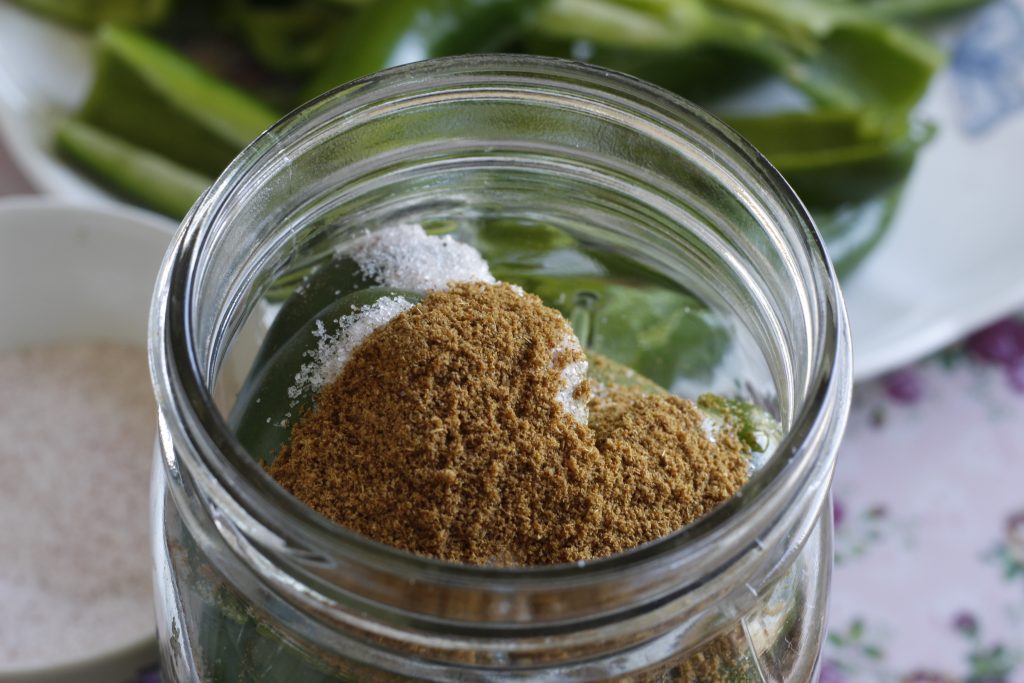
Stop filling the jar once the ingredients are close to the bottom part of the rim. This ensures that the jar will not be too full.
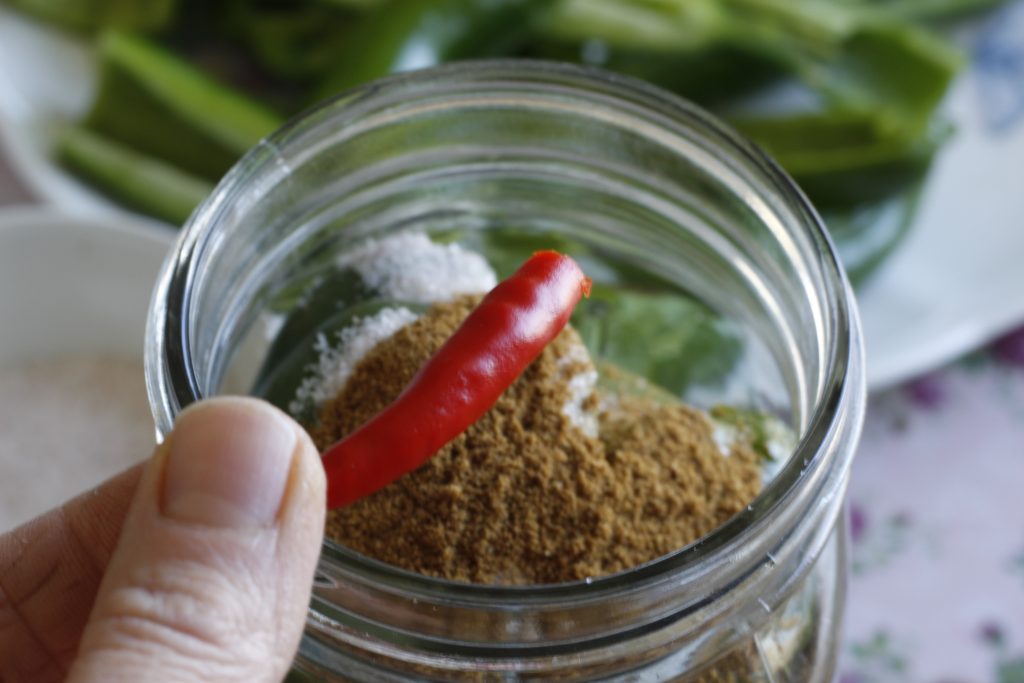
Five: Add one or two hot peppers. I like to jam them tightly along the side of the jar, so they do not float to the surface.

Six: Next, fill your jar with fresh, cool, filtered water. Pour it to be level with the top of the peppers.
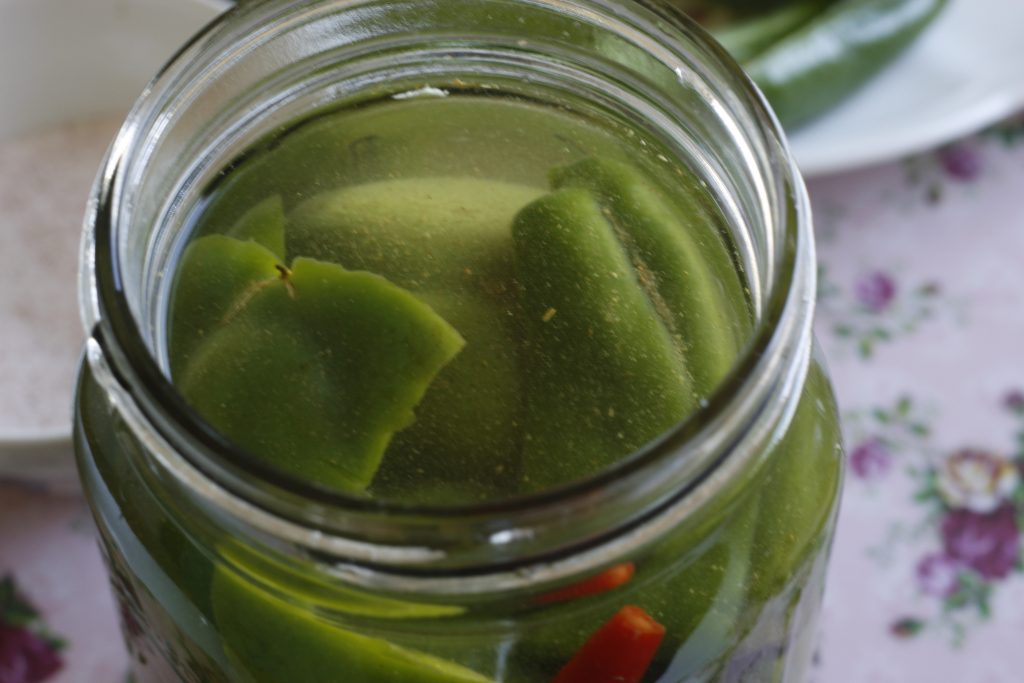
Seven: I use this type of lid when I am fermenting in a jar. Whenever I have used a ring and canning lid, I have placed a layer of parchment paper between the contents and the lid. This has kept the lid and ring from rusting.

Final Steps
There are different ways to proceed. I use both techniques and I have success with both.
The peppers can be weighed down inside the jars to keep them below the surface of the brine. Weighing down the vegetables allows you to place them in a dark spot and leave them for a few days.
My preference for peppers is to do the shaking method. I shake them three, or more, times a day. This allows the brine to cover the peppers repeatedly throughout the day. It is important to keep the jars covered with a kitchen towel to keep light from shining on them, or place them in a cabinet or dark place. Light will cause molds to grow in the jars. Just don’t forget about them in there!
Jars of ferments stay on my kitchen counter for that reason. I place crocks of sauerkraut that I ferment for a longer span of time, in the dark in the pantry.
In that case, I keep the vegetables submerged with a weight, as well.
Time To Wait
I made these lacto-fermented peppers in the afternoon, so I shook them that night and began counting days the following morning.
The next morning, I shook my jar over the sink and then opened the lid to allow any pressure to escape. I wiped the jar with a dish cloth, repeating with my other jar. Finally, I placed my jars on a plate and covered with a kitchen towel.
I repeated this process three times that day, and then two more days.


On the third day, after shaking, the brine was very active and bubbly. That is a sign throughout this process that the peppers are fermenting and all is well!
Storage Of Lacto-Fermented Peppers
When your peppers have fermented, they will need to be stored in the refrigerator. They will be good to eat for six months, or more. They can be eaten as long as there is no mold growing in your jar.
However, the longer they are stored, they will absorb the brine and may soften, due to continuing to slowly ferment.
The cold temperature of refrigeration slows down fermentation, but it does not stop the process.
Tips
- It is very important to use a clean fork, or tongs, to remove a pepper from the jar. Using fingers will introduce bacteria that will lead to mold growth, ruining all your hard work!
- To prevent a mess, shake your jar over the sink, as it will leak and drip. Open the lid to let the accumulated gases escape. Then, wipe your jar, and put the lid back on. Re-cover with a towel to keep dark.
- Lacto-fermented peppers are a wonderful addition to a salad, a charcuterie board, a Mexican type of meal, or a sandwich.
- Another recipe to try, which is a foundational one at my house, is Pink Fermented Sauerkraut. We are almost never without it!

I hope you try your hand at fermenting peppers in your kitchen. Let me know how it goes in the comments below!
Thanks for stopping by,
Courtney

Savory And Simple Lacto- Fermented Peppers

This recipe is as savory and delicious as it is simple and uncomplicated! With a few ingredients and a little bit of patience, the result is a health boosting accompaniment for salads, burritos, sandwiches, or anything you like paired with peppers, and a little heat!
Ingredients
- Fresh peppers, any variety, enough to fill a wide mouth jar
- 2 Tbsp. quality salt
- 2 Tbsp. cumin powder
- 1-2 whole small hot peppers
- Fresh, cool, filtered water
Instructions
- Rinse peppers thoroughly and dry with a clean kitchen towel.
- Prepare a wide-mouth canning jar by washing it with hot, soapy water and drying with a clean kitchen towel.
- Remove the stems, seeds, and membranes from the peppers.
- Cut your peppers into halves, if they are small. Cut into quarters or eighths, if they are large.
- Tightly pack your jar halfway with peppers.
- Add 1-2 whole, hot peppers to the side of your jar.
- Measure 1 Tbsp. of salt and 1 Tbsp. of cumin onto the top of the peppers in the jar.
- Continue to fill your jar with peppers, to the bottom of the rim space of your jar.
- Measure the remaining 1 Tbsp. of salt and 1 Tbsp. of cumin onto the top of the peppers.
- Fill your jar with fresh, cool, filtered water to the bottom of the rim of the jar.
- Place a lid on your jar and shake up the contents. Or, if you are weighing down the contents, do that now, and loosely place a lid on the top.
I love fermented foods and especially love to make kimchi around this time of year! Thanks for your step by step instructions.
I like to make kimchi as well! It is my pleasure, I hope you like them!
I do love fermenting anything other than cucumbers (pickles are an abomination) and we had such a bountiful urban harvest this year that we haven’t been able to even pick it all. Finding all the different ways to save these pickings will be so helpful
Wow! That’s great that your harvest has been so plentiful, you will be happy you saved your peppers in the winter and you can enjoy your harvest!